
Introduction
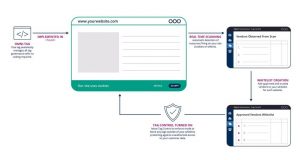
Salesforce Audience Studio is activated by adding the Audience Studio control tag to your website pages. The control tag is asynchronous, which means it doesn’t block and is optimized for faster page load times. JavaScript code should be placed in the <head> section of your pages to take advantage of all the features of the platform. Data will start logging into the platform approximately 24 hours after the tag is deployed.
To implement and test the Audience Studio control tag:
- Determine site and group structure
- Generate control tags and copy the code snippet into the <head> section of your pages. If you want, you can first place the code in your development environment before copying it to production.
- Verify the control tag by checking that the Audience Studio pixel.gif has been activated on your site.
- Understand duplicate calls
For each business need, you’ll need a per-config (config) control tag. For many Audience Studio customers, this will only require one control tag for one site. However, if you want to manage settings for different business units separately, i.e. managing and posting tags to your Sites, you can implement one Control Tag per Site.
Note: Audience Studio strongly recommends that the control tag be used as-is: any editing or modification of the Audience Studio control tag is at your own risk and will not be supported by Salesforce Audience Studio.
Step 1: Determine Site and Group Structure
The following are some configuration recommendations based on the number of sites and the complexity of your business. Discuss your individual needs with your Salesforce Audience Studio Solutions team to determine the most appropriate setup.
- One site = one tag (no site filter required for reporting)
- 2-10 sites = 2-10 tags (filtering available at the site level)
- More than 10 sites – You may want to consider grouping sites based on business unit to manage user permissions and reporting filtering (at the site and group level)
You can also associate a group name with each Site. A group is simply another level in the site hierarchy to simplify the navigation and administration of a large number of sites. If groups exist, an additional filter will be included anywhere a site filter currently exists to generate reports to allow a user to filter results by a group of sites and then to specific sites within a group.
In addition, the administrator can offer users access to specific groups or sites. For example, all sites in Group A (which includes Site 1 and Site 2) plus individual access to Site 4. If group access is provided, that user will have access to any Site associated with that group in the future.
Step 2: Generate Control Labels
To create the control tag, use the Audience Studio Console to create a new control tag for each site. Visit Manage >>Sites in the top navigation of the Salesforce Audience Studio Konsole. At the top of the list of sites, click the + Create site button and provide a name. Each one you create will get a Salesforce Audience Studio Conf configuration ID.
Control tag implementation
Retrieve your control tags for websites and landing pages by visiting Manage>> Sites in the top navigation of Audience Studio and clicking the </> (Actions) button on the right.
Choose JavaScript and then click the Copy to Clipboard button.
For best results, we recommend placing the control tag directly on the page in the <head>. This proper implementation ensures that you take full advantage of all of Audience Studio’s data collection and personalization capabilities. Audience Studio platform customers can use the SuperTag app as their tag management system. SuperTag allows you to easily manage all tags (including third-party tags) through a single interface in the Audience Studio platform and use Audience Studio’s best audience segments to inform tag delivery.
Step 3: Check the control tag
You can use the Chrome developer tools, the Firebug browser extension, or other tools to verify that the Audience Studio control tag fires. For AJAX control tags, you may see multiple “pixel.gif” in the list. The first is for the initial page load. Additional ‘pixel.gif’ files will appear for each additional AJAX load. The number of ‘pixel.gif’ files you see depends on the number of additional AJAX loads.
How to use chrome browser to check control tag
- Navigate to a page on your site where the control tag is implemented.
- Click the Chrome menu at the top right of the Chrome browser window.
- Select More Tools > Developer Tools. The Developer Tools panel will open at the bottom of your browser.
- At the top of the Developer Tools panel are several tabs. Click on the Network tab.
- The resulting Network tab displays several icons, one of which is for Filter. Click the Filter icon and make sure the form input for Filter appears.
- Type “pixel” into the filter form input.
- Verify that you see a “pixel.gif” from the domain “beacon.krxd.net” in the list of items. (You may need to refresh the page if you don’t see it)